Thursday, September 27, 2007

Friday, September 14, 2007
Transactions (EJB3)
- ACID
- Put all transactions in your EJBs (not in servlets)
- Container or Bean Managed (default in Seam)
- Container-managed-transactions (CMTs) preferred in Java EE. The Java EE container will handle comitting, rolling back, starting the transaction, etc. (no coding for the transactions).
- 6 types of transactions to choose from (default is REQUIRED)
- MANDATORY
- REQUIRED
- REQUIRES_NEW
- SUPPORTS
- NOT_SUPPORTED
- NEVER
- Example: Set this annotation before a method to use a transaction independent of an already-active transaction. Will attempt to commit in the end of the method.
@TransactionAttribute(Transacti
onAttributeType.REQUIRES_NEW)
public void addUser(User user) {
em.persist(user);
} - Bean-managed transactions (BMTs) allows a much more fine-grained control of transactions. (It is recommended to not use BMTs unless you cannot achieve the goals you are looking for using the CMT option.
Sunday, September 02, 2007
EJB3 EntityManager
- entityManager.persist(object);
- Can automatically generate a primary key
- Throws IllegalArgumentException if its parameter is not an entity type
- Throws TransactionRequiredException (Thrown by the persistence provider when a transaction is required but is not active).
- If the Entity Manager is an extended persistent context, it is legal to call persist() outside a transaction scope.
- There are 3 ways to find entities
- find(), getReference() and createQuery()
- The find() and getReference() methods works in the same way, they take the entity's class as a parameter and the primary key (Long).
Example:
Person person = null;
person = entityManager.find(Person.class, 5);
- Two differences between find() and getReference() methods
- find() returns null if the entity is not found and the getReference() method throws a EntityNotFoundException.
- find() method initializes the state, based on the lazy-loading policies of each property, getReference() does not do that.
- Both methods throws IllegalArgumentExceptions and they can be invoked outside the scope of transaction, but the object returned will be detached (unless entity manger is an extended persistent context).
- With the createQuery() method it is possible to use EJB QL, HQL.
- Summary: all the objects found using these three methods will remain managed as long as the persistent context in which you accessed them remains active.
- To update an object while it is while it is managed by the persistent context is very easy. All updates on returned object (from find(), getReference(), createQuery()) will be synchronized automatically (depending on the flush mode). This is true as long as an active persistence context is still associated with the transaction. (Read more about Transaction Attribute (defaults to Required) but can be set in either ejb-jar deployment descriptor or on the EJB's bean class using @TransactionAttribute)
- To merge state changes made to a detached entity back into persistent storage.
Person copy = entityManager.merge(person);
- There are two different scenarios for the merge method, depending on if the entity manager is already managing the person entity with the same ID or not.
- If the entity manager isn't managing the person entity with same ID, a full copy of the person parameter is made and returned from the merge() method. Now this copy will be managed by the entity manager and any additional setter methods called on it will be synchronized with the database (when flush).
- If the entity manager is already managing the person entity with the same ID, then the contents of the person parameter is copied into this managed object instance. The merge() operation will return this managed instance and the person parameter will remain detached and unmanaged.
- entityManager.remove(person);
- person instance will not be managed any longer and will become detached
- Associated entities may also be removed based on cascading rules
- remove() can only be undone using persist() again
- Use entityManager.refresh(person) if you are concerned that the managed person entity is not up-to-date with the database. Will overwrite any changes of the managed entity with the one in the database.
- Related entities may also be refreshed based on the setup cascading policy.
- Use entityManager.contains(person) if you want to know if "person" is currently managed by the persistent context.
- Use entityManager.clear() if you want to detach all managed entity instances from a persistence context. (Any changes made to managed entities are lost). Avoid this by calling flush() before clear().
- Flush is made automatically before any query (besides find() and getReference()) by the entity manager.
- Change default behaviour by using Flushmode.COMMIT instead of default AUTO.
- Using COMMIT means that changes are flushed only when the transaction commits, not before any query.
- Set FlushType by calling the entityManager.setFlushType() method
Transactions (read more here)
Saturday, September 01, 2007
Monitoring JBoss Tool
Hyperic HQ — Systems Management Software
Have not tried this, but will for sure have a closer look when I have got time.http://www.hyperic.com/downloads/
Tuesday, August 28, 2007
Use JBoss loader
server\default\deploy\jbossweb-tomcat55.sar\META-INF\jboss-service.xml
Change this attribute to "true" to use the JBoss loader, this was needed for our application to be able to read resources from the classpath.
Saturday, August 04, 2007
Exceptions
Solution:
object = entityManager.merge(object);
Changes to "object" will be synchronized to database when flushed next time. Force flush using entitityManager.flush()
Tuesday, July 24, 2007
HQL (Hibernate Query Language)
- From the Hibernate reference (chapter 14)
- Joins (SQL) (INNER, OUTER - Wikipedia)
- inner join essentially combines the records from two tables A and B based on a given join predicate (considered default join)
- left outer join for tables A and B always contains all records of the "left" table (A)
- right outer join - Every record from the "right" table (B) will be in the joined table at least once.
Monday, July 23, 2007
Friday, July 20, 2007
Tuesday, January 30, 2007
JFokus
Simon Phipps, Sun
Talked about the benefits with Open Source. And how it is hard to gain value from taking a snapshot and adding own functionalities without giving the new source code back to the community. You would become the "Regression test slave" as Phipps expressed it. Open Source: "Earn the living by giving back".
Talked a bit about:
ODF (OpenDocument Format)
OpenOffice.org.
Software Patents, compared them to the fact that:
"American have guns because American have guns" and so do they have Patents.
Interoperability is a buzz word that Phipps did not really believed in. He did not have very hight thought of Web Services. So he wanted to introduce a new buzz word "Substitutability". It should be easy to throw out a piece of software and put in a new piece without suffering.
- Open Standards
- OpenSolaris
- OpenSPARC.net
Introduction to Java EE 5 and EJB 3
Mike Keith - Wrote "Pro EJB 3" Book.
This was mainly an introduction to EJB3s and a comparison to EJB 2.1.
Mike showed how EJB3s are simplified by using:
- Annotations
- Dependency Injection
- Simplified Web Services
- New Java Persistence API
JPA - Java Persistence API
Mike Keith
JPA was created as part of EJB3 within the JSR 220
Released May 2006 as part of Java EE 5
Key points
- javax.persistence
- Annotations makes everything much easier, but it is still possible to use XML. (@Entity, @Id etc.)
- Persistence Context - Think of a hash table where all entities are a set of "managed" entity instances.
- EntitiyManager API
-- persist() - Insert a state of an entity into the DB
-- remove(), find(), merge() etc .
The entityManager is injected into the object using it.
- Queries - Dynamic and Static
-- Query API - getResultList() etc.
- ORM
- JPA can used in Java SE as well.
Recommended tools in Eclipse: Dali JPA Tools
Secure Coding Antipatterns: Avoiding vulnerabilities
Marting Englund, Sun
Went through 6 antipatterns - things not to do while coding java thinking about security. Many examples was related to for example applets where the user have access to the source code, but how often are they used in security related solutions these days. Anyway, the 6 antipatterns were:
1. Assuming Objects are Immutable
- Attacker can change signers of a class
How to prevent: Make a copy of mutable output and input parameters (deep cloning)
2. Checks on untrusted source
- Use subclass, e.g. extend File
How to prevent: Create a new object from the untrusted source. Is it really a File object or was it a subclass.
3. Ignoring Changes to Superclasses
All changes propagate to the subclass which might open security holes.
4. Neglecting to validate inputs
- Embedded requests bypassing security checks
Requests examples: GET http://.... or Queries
Good solution: Public method that takes care of all the security (validation) and then calls the Native method.
5. Misusing Public Static variables
- Attackers can replace values whenever, the variable becomes public in the whole JVM.
Good Solution: Use private static or even better Enum.
6. Believe a constructor exception destroys the object
Solution: Use intitialized flag, check the flag in all relevant methods
Following these 6 anitpatterns should make your code more secure. Not really sure it is needed all the time though.
check out:
java.sun.com/security/seccodeguide.html (a new version to be released soon)
Thursday, June 22, 2006
My SOA mind map
SOA Basic Design Principles (ASIG)
- Abstraction – Reduce and factor out details to focus on higher conceptual representation of an object (OO principle)
- Standardization – The service need to use open standards and communicate in a formulized way
- Generalization – The service needs to be fine grained enough to be efficient but course grained enough to be reusable.
SOA Features (FRISC)
- Flexibility – Loosely coupled services are very flexible as they can be used in a number of systems
- Reusability – The holy grail of system development. The ability to develop application components in a way that they can be reused by other applications.
- Interoperability – Standardized way of communication between business services.
- Scalability – Services are independent of each other and so can easily be scaled individually where required.
- Cost efficient – Reuse of existing business services reduce need for duplication and development and testing in new applications that re-uses these services (e.g. Service to get Postcodes)
Tuesday, June 06, 2006
JAXP and JAXB
The introduction
Java Architecture for XML binding (Article, Sun March 2003)
My short version of this article
JAXP - Java API for XML Processing
- Provides SAX and DOM
- Used to scan XML documents and break it up to pieces that are made available to the application.
- Differences Between SAX and DOM
- SAX starts from the beginning of the document and passes each piece to the application as it finds it. Nothing is stored in memory.
- DOM creates a tree of objects in memory that hte application can navigate through and access and manipulate data.
- Difference - SAX cannot update data to the XML file but in DOM we can.
- Another Java API that can make it easier to access XML documents
- Check out the example (Accessing an XML Document, JAXP and JAXB) or just be happy with the fact that: "Using JAXB instead of JAXP, there is no need to create and use a parser using and no need to write a content handler with callback methods. What this means is that developers can access and process XML data without having to know XML or XML processing".
- Using JAXB, you would:
- Bind the schema for the XML document.
- Unmarshal the document into Java content objects. The Java content objects represent the content and organization of the XML document, and are directly available to your program.
- What is a schema?
- A schema is an XML specification that governs the allowable components of an XML document and the relationships between the components.
- JAXB requires that the XML document you want to access has a schema, and that schema is written in the W3C XML Schema Language
- Binding a schema means generating (using a binding compiler) a set of Java classes that represents the schema. The binding compiler generates a set of interfaces and a set of classes that implement the interfaces. (Eg: books.xsd would generate BookType.java, BookTypeImpl.java etc.)
- Unmarshalling an XML document means creating a tree of content objects that represents the content and organization of the document. The content objects are instances of the classes produced by the binding compiler. See example (how to unmarshal the XML document)
Tuesday, May 30, 2006
Use SSL with Tomcat 5.5
1. $CATALINA_HOME or $CATALINA_BASE must be set in your environment, check in command prompt in windows
C:\echo %CATALINA_HOME%
2. Create a keystore using the keytool found in java/bin directory, check if you JAVA_HOME environment variable is set
C:\echo %JAVA_HOME%
If JAVA_HOME is not set, go to control panel -> system -> advanced and environment variables and add it and let it point to your java home directory.
When it is set this command should execute the keygenerator
C:\%JAVA_HOME%\bin\keytool -genkey -alias tomcat -keyalg RSA
If you are having any conflict or some keystore already exists you can specify where your new keystore should be placed like this:
C:\%JAVA_HOME%\bin\keytool -genkey -alias tomcat -keyalg RSA -keystore \temp\keystore
And specify a password value of "changeit" for both the keystore and the key
Important: Tomcat will by default look for a keystore named .keystore in the logged in user's home directory and it will also use the password "changeit" by default to open the keystore and for the generated key. This can however be configured in tomcat's server.xml file. But the password for the keystore and the key must be the same.
3. Edit server.xml in tomcat
This is what I did in the server.xml found in %CATALINA_HOME%\conf
Just uncomment the SSL snippet and add keystoreFile and keystorePass if you are using something else than "changeit"
<d;!-- Define a SSL HTTP/1.1 Connector on port 8443 -->
<d;Connector port="8443" maxHttpHeaderSize="8192"
maxThreads="150" minSpareThreads="25" maxSpareThreads="75"
enableLookups="false" disableUploadTimeout="true"
acceptCount="100" scheme="https" secure="true"
clientAuth="false" sslProtocol="TLS"
keystoreFile="C:\temp\keystore"
keystorePass="mysecretpassword" />
4. Restart Tomcat and try
https://localhost:8443This shoud give you the ordinary startup page if everything worked as it should

Check this link for all details
http://tomcat.apache.org/tomcat-5.5-doc/ssl-howto.html
/Crille
Tuesday, May 23, 2006
Acegi Implementation
This is a short description of how I implemented security in my application using Acegi. (Wont make much sense if not knowing how acegi works though). But here are some links to get started:
Various articles:
http://acegisecurity.org/articles.html
Acegi/Spring forum:
http://forum.springframework.org/forumdisplay.php?f=33
Lets get started
My application already had an User model mapped to the database having username and password.
Implementing Acegi was done in two major steps
1. Preparing the application (Acegi UserDetails, Role model)
2. Configure filters (acegiApplicationContext.xml)
First step (prepare application)
Add acegi details to the existing User
1. Implement Acegi UserDetails interface to existing user class.
2. Make properties and Hibernate mapping to the new properties in the class. Make sure to do setters to the implemented properties from UserDetails.
3. Create a Role and map it to the user. One user can have many roles (Set of roles).
4. Make a JUnit test and create a User, a Role, and give the User a this role, delete the user.
Second Step (Add and configure filters)
1. Start in web.xml and add the FilterToBeanProxy, this will secure filter invocations. It delegates to filterChainProxy that is the next step.
<filter>
<filter-name>Acegi Filter Chain Proxy
<filter-class>
org.acegisecurity.util.FilterToBeanProxy
<init-param>
<param-name>targetBean
<param-value>filterChainProxy
<filter-mapping>
<filter-name>Acegi Filter Chain Proxy
<url-pattern>/*
2. Create an acegiApplicationContext.xml file and add:
<bean id="filterChainProxy" class="org.acegisecurity.util.FilterChainProxy">
<property name="filterInvocationDefinitionSource">
<value>
CONVERT_URL_TO_LOWERCASE_BEFORE_COMPARISON
PATTERN_TYPE_APACHE_ANT /**=httpSessionContextIntegrationFilter,authenticationProcessingFilter,basicProcessingFilter,anonymousProcessingFilter,exceptionTranslationFilter,filterInvocationInterceptor
The FilterChainProxy is used to create and start up the filters. All filters are chained together by the FilterChainProxy and started in the specified order.
3. Lets have a look at the filters we have choosen to use in the filterChainProxy bean.
<!-- Automatically receives AuthenticationEvent messages -->
<bean id="httpSessionContextIntegrationFilter" class="org.acegisecurity.context.HttpSessionContextIntegrationFilter">
<property name="context" value="org.acegisecurity.context.SecurityContextImpl">
1. Find the hook where your application add Spring, could be in applicationContext.xml or a plugin in struts-config.xml.
2. Add a acegiApplicationContext.xml, e.g. in struts-config.xml. Better of is to add the acegiApplicationContext.xml in your spring application context file.
<plug-in classname="org.springframework.web.struts.ContextLoaderPlugIn">
<set-property property="contextConfigLocation" value="/WEB-INF/applicationContext.xml,/WEB-INF/acegiApplicationContext.xml">
Note that it is not necessary to make a seperate context file for acegi security. All acegi configuration could easily be done in your spring application context file. But it is good to keep things seperated.
3. Create the acegiApplicationContext.xml and start setting up the needed filters for Authentication, Authorization.
Wednesday, April 12, 2006
New Appfuse Project in Eclipse
All this is well documented by Matt Raible but I wanted to have a quick start with some config stuff that I often use for starting up a new AppFuse Project.
1. Download latest appfuse
2. Unzip and go to appfuse folder and run: ant new (and fill in name of project, name of domain, name of database)
3. In eclipse - File -> New Project -> Java Project
- Fill in Project Name and in "Create Project from existing source" browse to the folder where you got your new project created by the ant new command make in step 2.
- Clean project: Project->Clean...
- Open build.properties and Change/add information about your database, e.g.
database.admin.username=root
database.admin.password=password
hibernate.dialect=org.hibernate.dialect.MySQLDialect
database.driver_class=com.mysql.jdbc.Driver
database.url=jdbc:mysql://127.0.0.1:3306/myprojectdb
Notice that tomcat and ant environment variables have to be set in eclipse as well.
Read more about running Appfuse in eclispe here
Project should be built and tested successfullt.
All tutorials and other articles for AppFuse is found here
/C
Sunday, March 19, 2006
Config Eclipse for Web development - 3 steps
Just a fast track to set-up eclipse with WTP, Tomcat , configure it and write a small web application to test the environment.
Step 1.
Download and Install latest Eclipse SDK
Step 2.
Download and install an application server (tomcat in this case)
Step 3.
Download (wtp-all-in-one-sdk-1.0-win32.zip) and Install WTP (Web Tools Platform). Just unzip this archived file to the same folder as your eclipse home folder. The new wtp plugins should appear in the plugin folder.
Use this tutortial to configure and develop a small application to test the environment. Notice that we have already done the first step (Getting started, so skip that part).
That's it!!
-----------------------------------------------------------------------------------------------
Extra - Another useful plug-ins for Ecplise
QuantumDB - A database access plug-in for the Eclipse
1. Install plugin and restart Eclipse, Go to Window-Show View-Other-QuantumDB-Database Bookmarks.
2. Choose "New bookmark" in Database Bookmark window and "Add Driver"
3. Add a .jar for you db driver (e.g mysql-connector-java-3.1.7-bin.jar ) for MySQL.
4. Browse for Class name (e.g com.mysql.jdbc.Driver)
5. Enter username and password and the name of the database to connect to.
You should now be able to see the relations in the database.
/Crille
Tuesday, February 28, 2006
Interfacing the Camtech Server (part 2)
Next step is to use the camtech server from your application. We have now tested the existing Example code and know that it connects to the gateway using the generated private key and the imported certificate. Three steps to use this code from your application.
1. Copy the Example.java (see part 1) to your application.
2. Copy the needed jars (activation.jar, iaik_jce.jar, mail.jar, MerchantServer.jar) from .\MerchantServer\jars to your application. Set classpath if necessary and compile.
3. Copy the jars mentioned in step 2 to the J2EE container. In tomcat that is to the %CATALINA_HOME%\common\lib folder.
4. Set the system property "install.root" in the container. This can be done using command prompt:
SET JAVA_OPTS=-Dinstall.root=E:\Tools\MerchantServer
before running the startup script. More info found here and also check out A tomcat Service Manager for Windows
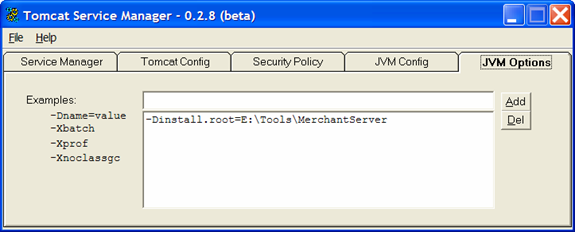 The tomcat service manager makes it easy to manage tomcat. I recommend to install this to avoid setting up temporarily properties and to get a good overview of the tomcat management.
5. Deploy your .war file to tomcat and test to run the Example code. Check the standard output, should have something like:
----------------------------------------------
The results of the transaction are as follows:
Summary Code: 0
Response Code: 00
Response Text: Approved
RRN: r9bTp96
Authorisation ID Response: DZ0
XID: 2187481
Settlement Date: 0301
--------------------------------------
Problems
If you get this exeption:
Exception: The merchant's private key could not be found"
Common reasons: the merchant id and password combination not being correct. If you are not sure of these values, then please delete and recreate this account, and request another certificate. This response is also generated if the keys or certificate have been corrupted. This scenario will also require you to delete and recreate this account, and request another certificate.
Please note that you will also receive this response if the -Dinstall.root property has not been set correctly when running your code. Please make sure that this property has been included within your Tomcat start up script. i.e. (step 4)
Thursday, February 23, 2006
Camtech Server Install and test (part1)
Installation
Downloaded the Version 6.2.0 of the Camtech Merchant Server
FTP site: 203.22.215.195
Login: channel
Password: CamtKeyCorp
http://www.camtech.com.au/Support/SoftwareandHardware.htm
Execute installer:
E:\Software\V6\620\Windows\MerchantServerInstaller620b2
And installed it under (for example):
E:\Tools\MerchantServer
Configure the MerchantServer….execute batch file
E:\Tools\MerchantServer\bin\ ConfigurationTool
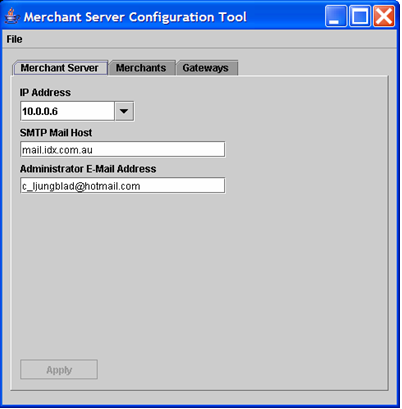

SMTP mail host:
Outgoing mail server
Administrator Email Address
The email address where the certificate will be sent to.
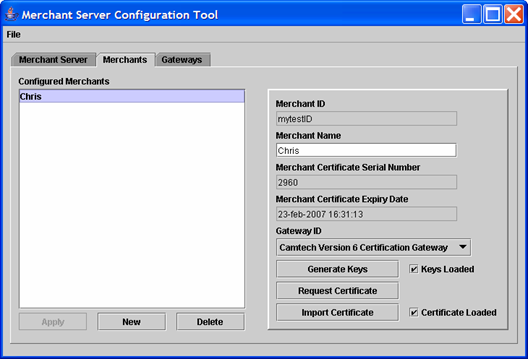
Generate Keys will generate the keypair
Request Certificate will send the certificate to the Administrator mail address
Import Certificate is used to import the emailed certificate to the MerchantServer, don’t forget to Apply.
Don’t worry about the Gateways tab unless you bump into problems later on.
For testing
Set classpath so it can compile the Example.java file:

Update the Example.java
I had to do 3 things:
1. Change the path to the “merchantserver.config” file
2. Change the MERCANT_ID and the PASSWORD to the configured ones.
private static final String CONFIG_FILE =
"../merchantserver.config";
……
/*
* The Merchant's details, as configured in the Camtech E-Commerce Configuration
* Tool.
*/
private static final String MERCHANT_ID = "mytestID";
private static final String PASSWORD = "pass123";
Set the classpath, make sure to have the MerchantServer.jar, iaik_jce.jar, activation.jar as well as the Example java folder in the classpath.
Compile Example.java

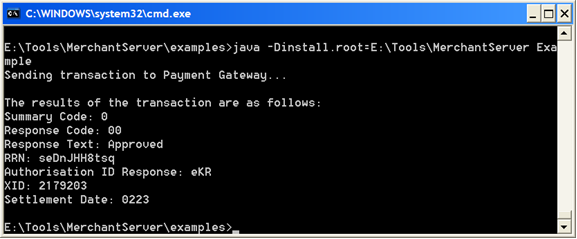
Voila...my server connected to the Payment Gateway and approved my creditcard :)
/Chris
Wednesday, February 22, 2006
Inaugural Sydney Spring User Group Meeting
Rod Johnson was there and talked about the goal of POJO development, Dependency Injection (a form of Inversion of Control), AOP (Aspect Oriented programming) and portable, lightweight abstractions for core services. He also talked about the new features in Spring 2.0 and beyond.
One thing that Rod emphazised was the fact that configuration was often made very differently, even in the same projects and how much easier it would be if configuration was done in one agreed way from start. He did also talked about testing and how Spring let you make push objects instead of pull objects and thereby make it much easier to test and showed some examples. It was all very interesting and I am looking forward to next meeting in April.
/Chris
MySQL user privileges
http://mysqld.active-venture.com/Adding_users.html
Then you can add new users by issuing GRANT statements:
mysql> GRANT ALL PRIVILEGES ON *.* TO monty@localhost
  ->     IDENTIFIED BY 'some_pass' WITH GRANT OPTION;
mysql> GRANT ALL PRIVILEGES ON *.* TO monty@'%'
  ->     IDENTIFIED BY 'some_pass' WITH GRANT OPTION;
mysql> GRANT RELOAD,PROCESS ON *.* TO admin@localhost;
mysql> GRANT USAGE ON *.* TO dummy@localhost;